Saturday, October 31, 2015

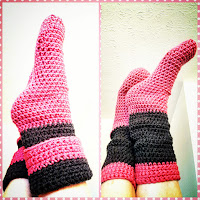
Favorite Bootie Slippers & Boot Socks


SUPER EASY. I just love these, this is the original pattern seen here. Go to the link to see more photos. 

Mama Kat says: "Make them snug enough but not tight.This pattern works so I didn't deviate from it. These can also become a long sock for boots."
Rnd 1: Magic Circle (or chain 3, slip into first and hdc for 6 in ring created) Ch 2 (counts as 1st HDC) work 5 HDC into magic circle slip stitch to join (6)
Rnd 2: ch 2 (1st HDC in the base of chain and here on in) 2 HDC in each stitch around, slip to join
Rnd 3: ch 2. 1 hdc in next st. 2 hdc in next st. repeat around. join. (12) 

Rnd 4: ch 2. 1 hdc in each st around. slip to join, continue working like this (remembering to create the extra hdc in the previous slip to join and the base of chain st) until you can place the length of the slipper over your foot, to the base of your ankle
Here you will work the heelch 2. (continue adding 1st hdc in base of chain) hdc until you have 12 stitches remaining stop here. turn and Chain 2 HDC across continue this till foot area is length you want. (I had 20 rows in total) from toe to back of heel) 
You want the slipper to be a snug fit, so when you get to the heel, put right sides together and slip stitch together. This is the basic Slipper Pattern, you can finish off here by completing 1 round of single crochet around the top of the slipper, and have a lovely pair of slip on slippers.
Continue for creating the ankle and boot length: Working in the round, HDC pick up stitches along the top of slipper. Working in HDC chain2 HDC around slip into 1st stitch (do not add in the extra stitches here, unless for making for a man who has wider calves) I find 1 hdc in each base of chains is enough increace to give a snug fit for a woman. Continue working in HDC until desired length of Sock boot is achieved. ~ Pattern by Lisa Auch.
.

Friday, October 30, 2015

Sweet Wings and Potato Salad

It's the end of October and I WANT SUMMER FOOD :D So....wings it is!

Super simple, made in the oven, altho I have deep fried them first before I sauced them for the oven. Your choice, I have a small space that doesn't want to let go of the 'fried' smell. So yuck, oven it is.

Buy as many chicken wings as you'll use that day, these are okay the next day but very sticky and hard to deal with, that's up to you. Separate the wings at the joints saving the wing tips for soup. Just freeze those tips until it's soup day. Every little bit helps with making chicken stock.

Pat the wings dry. Use nonstick spray on cookie sheets or whatever tins you have. Lightly salt and pepper the wings, spread them single layer and bake at 350 until golden and cooked through.


SAUCE:
Equal parts of ketchup and honey
1/4 to 1/2 onion, very finely chopped
1/4 TSP garlic powder
1/8 TSP of cayenne, want more heat...add more.

Make this sauce ahead of time, about an hour or so. The ingredients need to get to know each other ;)

Spoon sauce over cooked wings on the same cookie sheets. Bake for another 10-15 minutes. Turn broiler on medium, allow sauced wings to get a real good sizzle and some color. Remove them and allow to cool enough to handle. VERY messy and VERY sticky...sorry in advance!

Serve wings with Potato Salad or Slaw. My Potato Salad is stupid easy, just 2-3 lbs of cooked, cooled, cubed potatoes and 6 hard cooked eggs chopped. Add salt, pepper, a smidge of mustard and about 1 cup of your favorite mayo. I add a teeny bit of onion powder but you can add about 1/4 C minced onion if you'd rather. My husband hates crunchy things in his potato salad. Add fresh ground pepper. Cool and serve.

This is an original recipe protected & copyrighted. DO NOT reprint as your own.


Monday, October 26, 2015

Banana Cranberry Oatmeal Morning Muffins

Now Monday mornings aren't so bad with a great start with this sweet, gluten-free treat! The original recipe did not have oats or dried berries - just use your imagination with what you have on hand. I liked having the whole grain of oats to boost protein and fiber content. These are wonderful with a hot cup of dark roast :D

Double the basic muffin recipe from here and add 2 cups of blueberries or other fresh fruit. Lemon zest works nice with this, too.

Just because these are gluten-free doesn't make them carb free! Use discretion, because I don't :D

Preheat your oven to 350.

DRY BOWL
3 C gluten-free all purpose flour
1 1/2 TSP baking powder
1/2 TSP baking soda
1/2 TSP salt

WET BOWL
4 very ripe bananas, smashed
1 C sugar
1 1/2 TSP vanilla
2 large eggs
2/3 C canola or veggie oil
1 1/2 C regular plain yogurt

After mixing these bowls separately, now mix them together. ADD 1 1/2 C dried cranberries & 1 1/2 C oatmeal. Fold in until combined evenly. Batter will be very thick. Using paper liners, fill to full. Of course you don't have to use the liners, just spray muffin tins liberally with non stick spray.

Bake 25 minutes or until the middle bounces back when you touch it with your finger. Makes 2 dozen.

Basic Gluten-Free Muffin Recipe

This recipe is sort of a baseline from Krusteaz. and you can use your imagination to make them BETTER.

I've added oats, dried fruit, fresh fruit but you can also add nuts, poppy seeds, spices, pumpkin, grated carrot, lemon or orange zest, etc. I typically add whatever I happen to have or whatever is getting overripe.

Add 1 cup of fresh or dried fruit per dozen muffins; 1/2 cup of nuts.


DRY BOWL
1 1/2 C gluten-free all purpose flour
3/4 TSP baking powder
1/4 TSP baking soda
1/4 TSP salt

WET BOWL
1/2 C sugar
1/2 TSP vanilla
1 large eggs
1/3 C canola or veggie oil or softened butter
3/4 C plain yogurt

After mixing these bowls separately, now mix them together. ADD the fruit or nuts or whatever you chose that make these unique. Fold in until combined evenly. Batter will be very thick. Using paper liners, fill to full. Of course you don't have to use the liners, just spray muffin tins liberally with non stick spray.

Bake at 350 for 25 minutes or until the middle bounces back when you touch it with your finger. Makes about a dozen.

Tuesday, October 20, 2015

Gluten-Free Carrot & Raisin Apple Pie Muffins

For this recipe, I used Krusteaz Gluten-Free All Purpose Flour. It measures one for one, the easier the better for me. I decided to bake these to use up some apples I had on hand...which is typically how I bake or cook.

This recipe isn't full of 'spice' like other autumn recipes are, such as pumpkin EVERYTHING. It's a nice warm and fuzzy kind of muffin that can be for breakfast or any time of day.

Preheat oven at 350. I use paper muffin cups, if you do not, liberally spray the tins with a baking spray.

2 C diced apples
1 C raisins
2 grated carrots

2 1/2 C all purpose flour
1 TSP baking soda
1/2 TSP baking powder
1/4 TSP salt
1 1/2 TSP cinnamon

1 1/2 C packed brown sugar    
1 C milk
1 TSP vanilla
2 eggs
1/2 C canola oil

In separate bowls, mix dry ingredients and wet ingredients. Carefully mix the two together, mixture will be thick. Fold in apples, grated carrot and raisins. Fill muffin cups about 3/4 full. Bake for 25-30 minutes.

Cool on a rack. You can ice or glaze them.

Monday, October 19, 2015

Simplest Ballet Slipper

I love to use 100% cotton yarn, there's something so rustic about it to me. It reminds me of making those first dishcloths my grandmother taught me as an apprentice crocheter.
Simple & Washable

These slippers are PERFECT for Peaches & Cream cotton yarn, and PERFECT for warmer weather! I used two colors, two balls of yarn with a G hook. I wanted these slippers as dense as possible without making a stitch that would be uncomfortable on the bottom of bare feet. These are made to fit a woman's size 8-9. This pattern is easily adjustable.

Row 1, Chain 4, slip stitch to connect.
Row 2, Chain 1, six double crochets, slip stitch to connect.
Row 3, Chain 1, two sc in every dc stitch, ss to connect.
Row 4, Chain 1, one sc in first stitch, two in the next, continue until the last stitch, ss to connect.
Row 5, [this is the fun part] one sc in every sc working in the round for at least 10 - 15 total rows, depending on foot size.

Row 12 [dep on size], to make the sides, one sc in 22 stitches, chain 1, turn, sc in every stitch, continue until there are enough rows for the size you want. This is the side and bottom of the slipper. Mine came out to 27 rows. Finish off.

I changed colors for the heel at 20 rows, it can be done at 16 or not at all, optional.

Turn slipper inside out, match sides, slip stitch or sew the seam to make the heel.

As you crochet these, try them on often to gauge the size you need. At this time, you'll notice that the sides are quite loose. Using either color of yarn, make a starting loop and connect it to the corner of the slipper where the side starts. Make a chain about 13-14" long. Finish off. Weave the chain in and out of the rows, every other one, cinch as you go to fit, tie in a bow at the heel.

These ballet slippers are very easy to adorn with buttons, embroidery, beads, etc. Have fun!


This is an original design protected & copyrighted by the designer. DO NOT reprint as your own.

Slouchy Slipper Socks

These Slipper Socks were very easy and quick. These are terrific for home and the hospital. These are great for new moms in the labor room :D

I used Caron One Pound yarn in two colors and an I hook. I made these to fit a size 8-9 women's shoe size. To make them smaller, begin the increase/decrease rows at about Row 16.

Chain 4, slip stitch to connect. Chain 2, 6 half double crochet in the chain circle.
Rows 1-11

Chain 2, two half double crochet in every stitch, connect with slip stitch.

Chain 2, one hdc in first stitch, two hdc in next; continue same until last stitch, connect with slip stitch.

Chain 2, one hdc in every stitch, adding one hdc next to start chain of the last row. Continue new rows until there are 26 stitches in a row. This will give the illusion of a tapered toe. Continue rows for next three rows without extra stitch at the end of the row, keeping to 26 stitches.

Begin to hdc in every stitch in the round until Row 20.

Decrease
On the front of the sock, decrease twice [skip one hdc twice]. This will give a slight bend to the sock, this is optional.

On the back of the sock, INCREASE three times [2 hdc in one stitch three times]. This will give the illusion of a heel in the sock.

Row 21, decrease ONCE in the front of the sock, increase TWICE in the back.

Row 22 & 23, increase TWICE in the back of the sock; it will look somewhat like a fan shape.

Increasing and decreasing are over, continue one hdc in ever stitch in the round until Row 28.

Row 28, at the back of the sock [to hide the color change], change colors [optional]. Continue until Row 42.
Increase, fan shape

Row 42, at the back of the sock, change colors and go to a single crochet for the next six rows.

At this time, you may finish off or continue for a longer slouchier slipper sock. In the finished socks below, they are long enough to cuff.


Finished!
This is an original design protected & copyrighted by the designer. DO NOT reprint as your own.