I can't emphasize this enough....this is STUPID EASY. The cool thing about cobbler is that it's way easier than making a fruit pie. I love pie, but making pie crust just doesn't come easy to me.
Oh,...btw....DON'T use a non stick baking tin, use a 9x13 glass dish like pyrex, or something similar. I now have melted butter spitting all over my what used to be clean oven. SIGH.
Anyway....preheat to 350, put a stick of real butter in the baking dish and melt in the oven.
Use canned or prepared fruit (large can is about 21-28oz). If you are using fresh prepared fruit, just simmer your chosen fruit on the stove with a bit of sugar to make a syrup.
MIX:
1 C flour
3/4 C sugar
2 TSP baking powder
1 C milk
1 TSP vanilla
1/4 TSP salt
Mix all ingredients. After butter is melted, pour batter evenly into dish. DO NOT STIR BUTTER AND BATTER. Spoon your chosen fruit on top of batter and butter. DO NOT STIR. Put into oven for about 45 minutes or until it's a bubbly golden brown.
*NOT gluten-free, but you can sub gluten-free all purpose flour. Also can use self rising, just omit the baking power.
Like I said...STUPID EASY, especially if you are using prepared canned fruit. But summer has it's pluses with fresh fruit readily available, take advantage of it!
Thursday, July 20, 2017
Thursday, January 7, 2016
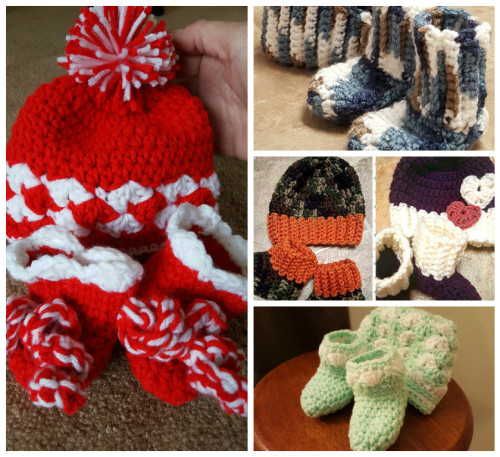
#fillthebooties
#fillthebooties is a personal initiative and ministry to literally do exactly that, fill the booties. Even after losing my babies, I never put my hook and yarn completely away. I set it aside for awhile, but never lost hope that what little I can do for an unplanned little one will be a hand extended with love, hope and Jesus.
I crochet. A LOT. And I love to give what I create to expecting moms who don't have a crocheting mom or grandmom. If you know my story, I am post abortive and have miscarried. I know what it's like to lose a planned child and the tragedy of choosing to end the life an unplanned child. I hate abortion; I hate miscarriage. But God's plan has not changed for me, or for you.
 You see, the irony is that I learned how to crochet and sew for my future children when I was eight years old. Now, that doesn't mean I'm some kind of expert but I do love creating. Since those years of abortion and miscarriage, God still gave me three sons - He still trusted me with these wonderful young men even after all that had happened. And for that, I am eternally grateful to my Lord.
I give much of what I create to a local pregnancy center that gives 'blessing baskets' to expecting moms and to friends who need a unique gift for their friends or family. And now I have the honor of making all kinds of things for our future grandchild due this summer! A new grandchild will always give a crafter ideas and motivations.
#fillthebooties. Love unconditionally. Share Jesus. Give some hope away to someone who needs it.

Sunday, December 6, 2015
Is the Government Banning the American Flag?
As an avid crocheter, I was floored by a hospice telling a fellow charity crafter to not make an afghan that looks like the flag! Read on, and I think I'll pick up some red, white and blue yarn ;)
"A crafter who makes afghans for a hospice in/near Philadelphia said: The hospice program at one of my local hospitals collects afghans to give to their patients. Unlike any other program around here, they give you the yarn to use. The last time I made one of these the colors were blue, red and white. Even though we were told not to make anything that looked like the American flag, it felt very flag-like to me."
KeepLifeLegal: Is the Government Banning the American Flag?: First, I love that this crafter does this for the comfort others. God Bless her and others who give up valuable time and space to do things...
Monday, November 9, 2015
Baby Booties & Hat Set
And they look like boots! HA! I was asked to make a set of booties for a young lady of about 6 months old. All us girls have cold feet this time of year ;) So, I adapted a pattern I used for big girl feet for this special young lady!

I used an 'G' hook to develop this pattern and it is easily adjustable for bigger kids. I prefer to use acrylic yarn for these so that they can be tossed into the washer and dryer without fear of shrinking. As you can see in the photo on the right, the right bootie can be made into a slipper if you'd like. REMEMBER that these bootie slippers are slippery for walkers so please be mindful and use caution!
BOOTIES - 'G' hook.
RND 1: Magic Circle, CH 2, 5 HDC. Join, pull to close.
RND 2: CH 2, then 2 HDC in each HDC, join. (12)
RND 3: CH 2, then 2 HDC in next, 1 HDC, 2 HDC, etc. Join (18)
RND 4: CH 2, HDC in each stitch, 18 total, join, for a total of 7 rows.
HEEL: CH 2, 12 HDC, turn, for five rows.
Sew or slip stitch heel, inside out. When you're finished, it will look like the bootie on the right in the photo above. You can change colors now if you'd like.
ANKLE: CH 1, SC all around bootie opening, total of 20 SC. Four rows total. CH 3, DC in each SC for two rows. Finish off.
 SOCK HAT - 'I' hook.
CH 27, SC in second chain from hook, SC in each chain, total of 25 SC.
CH 1, turn, SC in first stitch, then SC for the next 24 stitches in BACK LOOPS ONLY. SC in BOTH loops in last stitch.
Continue for 52 total SC rows or until it is your desired size. *NOTE* When working in back loop single crochets, I make a complete SC in the first and last stitch of the row so that the fabric won't stretch out of shape.
Slip stitch the sides together, finish off leaving a long tail to help tie off the top. Using your hook, weave double strand of yarn in and out about every 3 rows and pull tight to make the hat shape. Tie off with the previous yarn tail. You can either make a pompom or leave plain. If you choose a pompom, use your super human strength to make it TIGHT so that the clipped yarn won't come loose :D Attach the pompom with the other yarn tails created earlier, tie it tight, finish off!
You'll see that the stretchy fabric of your new baby Sock Hat will be quite comfy for your baby!


I used an 'G' hook to develop this pattern and it is easily adjustable for bigger kids. I prefer to use acrylic yarn for these so that they can be tossed into the washer and dryer without fear of shrinking. As you can see in the photo on the right, the right bootie can be made into a slipper if you'd like. REMEMBER that these bootie slippers are slippery for walkers so please be mindful and use caution!
BOOTIES - 'G' hook.
RND 1: Magic Circle, CH 2, 5 HDC. Join, pull to close.
RND 2: CH 2, then 2 HDC in each HDC, join. (12)
RND 3: CH 2, then 2 HDC in next, 1 HDC, 2 HDC, etc. Join (18)
RND 4: CH 2, HDC in each stitch, 18 total, join, for a total of 7 rows.
HEEL: CH 2, 12 HDC, turn, for five rows.
Sew or slip stitch heel, inside out. When you're finished, it will look like the bootie on the right in the photo above. You can change colors now if you'd like.
ANKLE: CH 1, SC all around bootie opening, total of 20 SC. Four rows total. CH 3, DC in each SC for two rows. Finish off.

CH 27, SC in second chain from hook, SC in each chain, total of 25 SC.
CH 1, turn, SC in first stitch, then SC for the next 24 stitches in BACK LOOPS ONLY. SC in BOTH loops in last stitch.
Continue for 52 total SC rows or until it is your desired size. *NOTE* When working in back loop single crochets, I make a complete SC in the first and last stitch of the row so that the fabric won't stretch out of shape.
Slip stitch the sides together, finish off leaving a long tail to help tie off the top. Using your hook, weave double strand of yarn in and out about every 3 rows and pull tight to make the hat shape. Tie off with the previous yarn tail. You can either make a pompom or leave plain. If you choose a pompom, use your super human strength to make it TIGHT so that the clipped yarn won't come loose :D Attach the pompom with the other yarn tails created earlier, tie it tight, finish off!
You'll see that the stretchy fabric of your new baby Sock Hat will be quite comfy for your baby!

This is an original design protected & copyrighted by the designer. DO NOT reprint as your own.
Sunday, November 1, 2015
Very Long Ripple Scarf
 I just finished this scarf and it came out great! I used navy, baby blue and white. This is a Red Heart free pattern [LW1471] you can see here. I followed this pattern completely but used a K hook instead. It's VERY long, meant to be worn like the pattern showed [see link above]. I did not made the hat to match.
 I love the long strip scarf this pattern makes; it reminds me of the strip afghans I used to crochet in the 90's. I believe this easy pattern can be adjusted to length and enough strips to make a beautiful afghan :D That sounds like a future project for me :D :D :D
Rnd 1: With CA, ch 281. Rnd 1 (Right Side): Sc in 2nd ch from hook, * ch 1, skip next 2 ch, shell in next ch, ch 1, skip next 2 ch, sc in next ch **, sc in next ch; rep from * across, end at **; turn to work on opposite side of beg ch; sc in same ch as last sc; rep from * across, end at ** changing to CB in last sc; join with a sl st to first sc – 40 ch-3 sps on each side.
Rnd 2: With CB, ch 1, sc in same sc as joining, sc in ch-1 sp, ** ch 3, dc in next 2 dc, shell in ch-3 sp, dc in next dc, * CL2, dc in next dc, shell in ch- 3 sp, dc in next dc; rep from * across first side; dc in next dc, ch 3, sc in ch-1 sp **, sc in next 2 sc, sc in ch-1 sp; rep from ** to ** across next side; sc in last sc changing to CC; join.
Rnd 3: With CC, ch 1, sc in same sc as joining, sc in next sc, sc in ch-3 sp, ** ch 3, skip next 2 dc, dc in next 2 dc, shell in ch-3 sp, dc in next dc, * CL3, dc in next dc, shell in ch-3 sp, dc in next dc; rep from * across first side; dc in next dc, ch 3, skip next 2 dc, sc in ch-3 sp **, sc in next 4 sc, sc in ch-3 sp; rep from ** to ** across next side; sc in last 2 sc changing to CA; join.
Rnd 4: With CA, ch 1, sc in same sc as joining and next 2 sc, 2 sc in ch-3 sp, ** ch 3, skip next 2 dc, dc in next 2 dc, shell in ch-3 sp, dc in next dc, * CL3, dc in next dc, shell in ch-3 sp, dc in next dc; rep from * across first side; dc in next dc, ch 3, skip next 2 dc, 2 sc in ch-3 sp **, sc in next 6 sc, 2 sc in ch-3 sp; rep from ** to ** across next side; sc in last 3 sc; join. Fasten off.
Special Instructions:
-> CL2: Yo and draw up a lp in next dc, yo and draw through 2 lps, skip next 2 sc, yo and draw up a lp in next dc, yo and draw through 2 lps, yo and draw through all 3 lps rem on hook.
-> CL3: Yo and draw up a lp in next st, yo and draw through 2 lps, skip next 3 sts, yo and draw up a lp in next st, yo and draw through 2 lps, yo and draw through all 3 lps rem on hook.
-> Shell: (2 dc, ch 3, 2 dc) all in st or sp indicated.
-> CA, CB, CC are the colors used in order, this is a four row scarf with three colors.
Saturday, October 31, 2015
Favorite Bootie Slippers & Boot Socks

SUPER EASY. I just love these, this is the original pattern seen here. Go to the link to see more photos.
Mama Kat says: "Make them snug enough but not tight.This pattern works so I didn't deviate from it. These can also become a long sock for boots."
Rnd 1: Magic Circle (or chain 3, slip into first and hdc for 6 in ring created) Ch 2 (counts as 1st HDC) work 5 HDC into magic circle slip stitch to join (6)
Rnd 2: ch 2 (1st HDC in the base of chain and here on in) 2 HDC in each stitch around, slip to join
Rnd 3: ch 2. 1 hdc in next st. 2 hdc in next st. repeat around. join. (12)
Rnd 4: ch 2. 1 hdc in each st around. slip to join, continue working like this (remembering to create the extra hdc in the previous slip to join and the base of chain st) until you can place the length of the slipper over your foot, to the base of your ankle
Rnd 4: ch 2. 1 hdc in each st around. slip to join, continue working like this (remembering to create the extra hdc in the previous slip to join and the base of chain st) until you can place the length of the slipper over your foot, to the base of your ankle
Here you will work the heel. ch 2. (continue adding 1st hdc in base of chain) hdc until you have 12 stitches remaining stop here. turn and Chain 2 HDC across continue this till foot area is length you want. (I had 20 rows in total) from toe to back of heel)

You want the slipper to be a snug fit, so when you get to the heel, put right sides together and slip stitch together. This is the basic Slipper Pattern, you can finish off here by completing 1 round of single crochet around the top of the slipper, and have a lovely pair of slip on slippers.
Continue for creating the ankle and boot length: Working in the round, HDC pick up stitches along the top of slipper. Working in HDC chain2 HDC around slip into 1st stitch (do not add in the extra stitches here, unless for making for a man who has wider calves) I find 1 hdc in each base of chains is enough increace to give a snug fit for a woman. Continue working in HDC until desired length of Sock boot is achieved. ~ Pattern by Lisa Auch.
.
Friday, October 30, 2015
Sweet Wings and Potato Salad
It's the end of October and I WANT SUMMER FOOD :D So....wings it is!
Super simple, made in the oven, altho I have deep fried them first before I sauced them for the oven. Your choice, I have a small space that doesn't want to let go of the 'fried' smell. So yuck, oven it is.
 Buy as many chicken wings as you'll use that day, these are okay the next day but very sticky and hard to deal with, that's up to you. Separate the wings at the joints saving the wing tips for soup. Just freeze those tips until it's soup day. Every little bit helps with making chicken stock.
Pat the wings dry. Use nonstick spray on cookie sheets or whatever tins you have. Lightly salt and pepper the wings, spread them single layer and bake at 350 until golden and cooked through.

SAUCE:
Equal parts of ketchup and honey
1/4 to 1/2 onion, very finely chopped
1/4 TSP garlic powder
1/8 TSP of cayenne, want more heat...add more.
Make this sauce ahead of time, about an hour or so. The ingredients need to get to know each other ;)
Spoon sauce over cooked wings on the same cookie sheets. Bake for another 10-15 minutes. Turn broiler on medium, allow sauced wings to get a real good sizzle and some color. Remove them and allow to cool enough to handle. VERY messy and VERY sticky...sorry in advance!
 Serve wings with Potato Salad or Slaw. My Potato Salad is stupid easy, just 2-3 lbs of cooked, cooled, cubed potatoes and 6 hard cooked eggs chopped. Add salt, pepper, a smidge of mustard and about 1 cup of your favorite mayo. I add a teeny bit of onion powder but you can add about 1/4 C minced onion if you'd rather. My husband hates crunchy things in his potato salad. Add fresh ground pepper. Cool and serve.
This is an original recipe protected & copyrighted. DO NOT reprint as your own.
Super simple, made in the oven, altho I have deep fried them first before I sauced them for the oven. Your choice, I have a small space that doesn't want to let go of the 'fried' smell. So yuck, oven it is.
 Buy as many chicken wings as you'll use that day, these are okay the next day but very sticky and hard to deal with, that's up to you. Separate the wings at the joints saving the wing tips for soup. Just freeze those tips until it's soup day. Every little bit helps with making chicken stock.
Pat the wings dry. Use nonstick spray on cookie sheets or whatever tins you have. Lightly salt and pepper the wings, spread them single layer and bake at 350 until golden and cooked through.

SAUCE:
Equal parts of ketchup and honey
1/4 to 1/2 onion, very finely chopped
1/4 TSP garlic powder
1/8 TSP of cayenne, want more heat...add more.
Make this sauce ahead of time, about an hour or so. The ingredients need to get to know each other ;)
Spoon sauce over cooked wings on the same cookie sheets. Bake for another 10-15 minutes. Turn broiler on medium, allow sauced wings to get a real good sizzle and some color. Remove them and allow to cool enough to handle. VERY messy and VERY sticky...sorry in advance!

This is an original recipe protected & copyrighted. DO NOT reprint as your own.
Subscribe to:
Posts (Atom)